How a DevTools Extension is Made
A guide on how a production-level devtools extension is made
I've never built any browser extension, much less one for the Devtools.
Out of curiosity I started looking around and I've found the Google Chrome DevTools Extensions docs that served as an introduction of the different parts involved, but it wasn't enough to get on my feet and start developing my own.
The problem was that I lacked knowledge about the basic concepts behind a browser extension.
The complete Google Chrome extensions documentation is extensive, and in many cases serves more like an API reference rather than a guide, but it gave me a broad picture about the multiple moving parts that are involved, and to learn that you even need to build an intercommunication bus between the different components of the extension.
But beyond that, there wasn't a good resource for me to have a complete picture of what was required and what would be the most useful for a DevTools extension since it's a subset of what browser extensions can do.
A pragmatic way to learn about all of this that I decided to take is through open-source code. Initially, I started looking into the React DevTools, but since it's part of the React monorepo it would take some time to identify each of the relevant packages.
Fortunately for my needs, the Vue DevTools repo is self-contained, allowing me to examine it in complete isolation from other parts of the Vue code.
This is a guide through the main parts of the official Vue DevTools extension to learn from it and understand a successful approach for building these kinds of tools.
I hope that this way you can learn with a real-world example what exactly each file does, and how everything fits together. This guide isn't Vue specific in any way, You don't need to be familiar with Vue at all to follow and hopefully learn something from this guide.
This guide is divided under different sections and goes step by step with links to the official source code and analyzing some relevant snippets along the way.
Let's dive right into it!
Table of contents
- Vue Devtools Overview
- Vue detector
- Background script
- Hook
- DevTools page
- Backend and Frontend
- Proxy
- Frontend
- Backend
Vue Devtools Overview
The code, which is hosted on GitHub, is organized as a monorepo consisting of different packages, under the /packages directory.
I followed the manual installation instructions and I was able to get a development version of the extension up and running on my browser.
By following those instructions I learned that we should start by looking into the shell-chrome directory, as the starting point of this journey. Here we find the manifest.json file, which contains all the metadata related to the browser extension.
Manifest file
Here we can find some relevant entry points:
  "devtools_page": "devtools-background.html",
  "background": {
    "scripts": [
      "build/background.js"
    ],
    "persistent": false
  },
    "content_scripts": [
    {
      "matches": [
        "<all_urls>"
      ],
      "js": [
        "build/hook.js"
      ],
      "run_at": "document_start"
    },
    {
      "matches": [
        "<all_urls>"
      ],
      "js": [
        "build/detector.js"
      ],
      "run_at": "document_idle"
    }
  ]
Each of those specified files can be seen as different entry points because browser extensions are composed of multiple scripts that run in different contexts.
Before jumping into studying these files in detail, I'll like to briefly focus on the build tooling for this project.
Notice how all of these paths start with build/ but we don't have a build directory inside shell-chrome. Let's take a quick look at our inner package.json file to understand why:
// shell-chrome/package.json

{
  "name": "@vue-devtools/shell-chrome",
  "version": "0.0.0",
  "dependencies": {
    "@vue-devtools/app-backend": "^0.0.0",
    "@vue-devtools/app-frontend": "^0.0.0",
    "@vue-devtools/shared-utils": "^0.0.0"
  },
  "devDependencies": {
    "@vue-devtools/build-tools": "^0.0.0",
    "webpack": "^4.19.0",
    "webpack-cli": "^3.1.0"
  }
}
It defines other packages from the monorepo as dependencies. The internal packages are those prefixed with @vue-devtools.
The way this monorepo is structured is by using Yarn workspaces. Let's go to the root package.json of the whole project:
  "workspaces": [
    "packages/*"
  ],
Everything under the packages directory is part of this monorepo. Now let's see what the main build script looks like:
"build": "cd packages/shell-chrome && cross-env NODE_ENV=production webpack --progress --hide-modules"
That's it! Now we know that inside packages/shell-chrome the project is using Webpack to produce a build. So that's when the build folder must be being created.
Analyzing the whole build process of this extension is out of scope for this post but if you're interested in learning more about it, this webpack.config.js file is a good place to start.
Types of scripts
The main type of scripts we are going to see are the following:
As part of this guide, I'll be introducing each one of them the moment we come across them on our journey through the Vue DevTools extension.
Now, let's jump into the actual logical architecture of this extension.
Vue DevTools architecture
Each different type of script represents a different entry point for a browser extension.
Vue detector
Let's start by looking at src/detector.js. This is a content script.
Content scripts are the parts of an extension that are running in the context of the current web page. They can query the DOM, make changes to it, and communicate with the parent extension context.
Unlike regular page scripts, they have one important limitation. Content scripts live in "isolated worlds". They can't access variables created by other scripts, even if those variables are added to the window global.
To workaround the "isolated worlds" limitation, detector.js includes this helper:
// shell-chrome/src/detector.js

function installScript(fn) {
  const source = ";(" + fn.toString() + ")(window)";

  if (isFirefox) {
    window.eval(source); // in Firefox, this evaluates on the content window
  } else {
    const script = document.createElement("script");
    script.textContent = source;
    document.documentElement.appendChild(script);
    script.parentNode.removeChild(script);
  }
}
It wraps the provided fn function on a IIFE string to add it on the page. Now it can run just like any other regular script on the page.
// shell-chrome/src/detector.js

if (document instanceof HTMLDocument) {
  installScript(detect);
  installScript(installToast);
}
detector.js injects two functions using this technique, detect and installToast. These are known as... injected scripts.
The pattern of injected scripts is unofficial, but it became an ad-hoc standard by the community, based on the common case of needing to run scripts on the current page with full access to the window global and changes performed by other scripts.
I'll start with the installToast injected script. This function adds a __VUE_DEVTOOLS_TOAST__(message, type) method to the window object so that messages like "Remote Devtools Connected" can be shown. Its code is part of the app-backend package of the repo, under the toast.js module. Seeing a reference to "backend" might seem odd at this point. Don't worry too much about it now, we are going to explain it later.
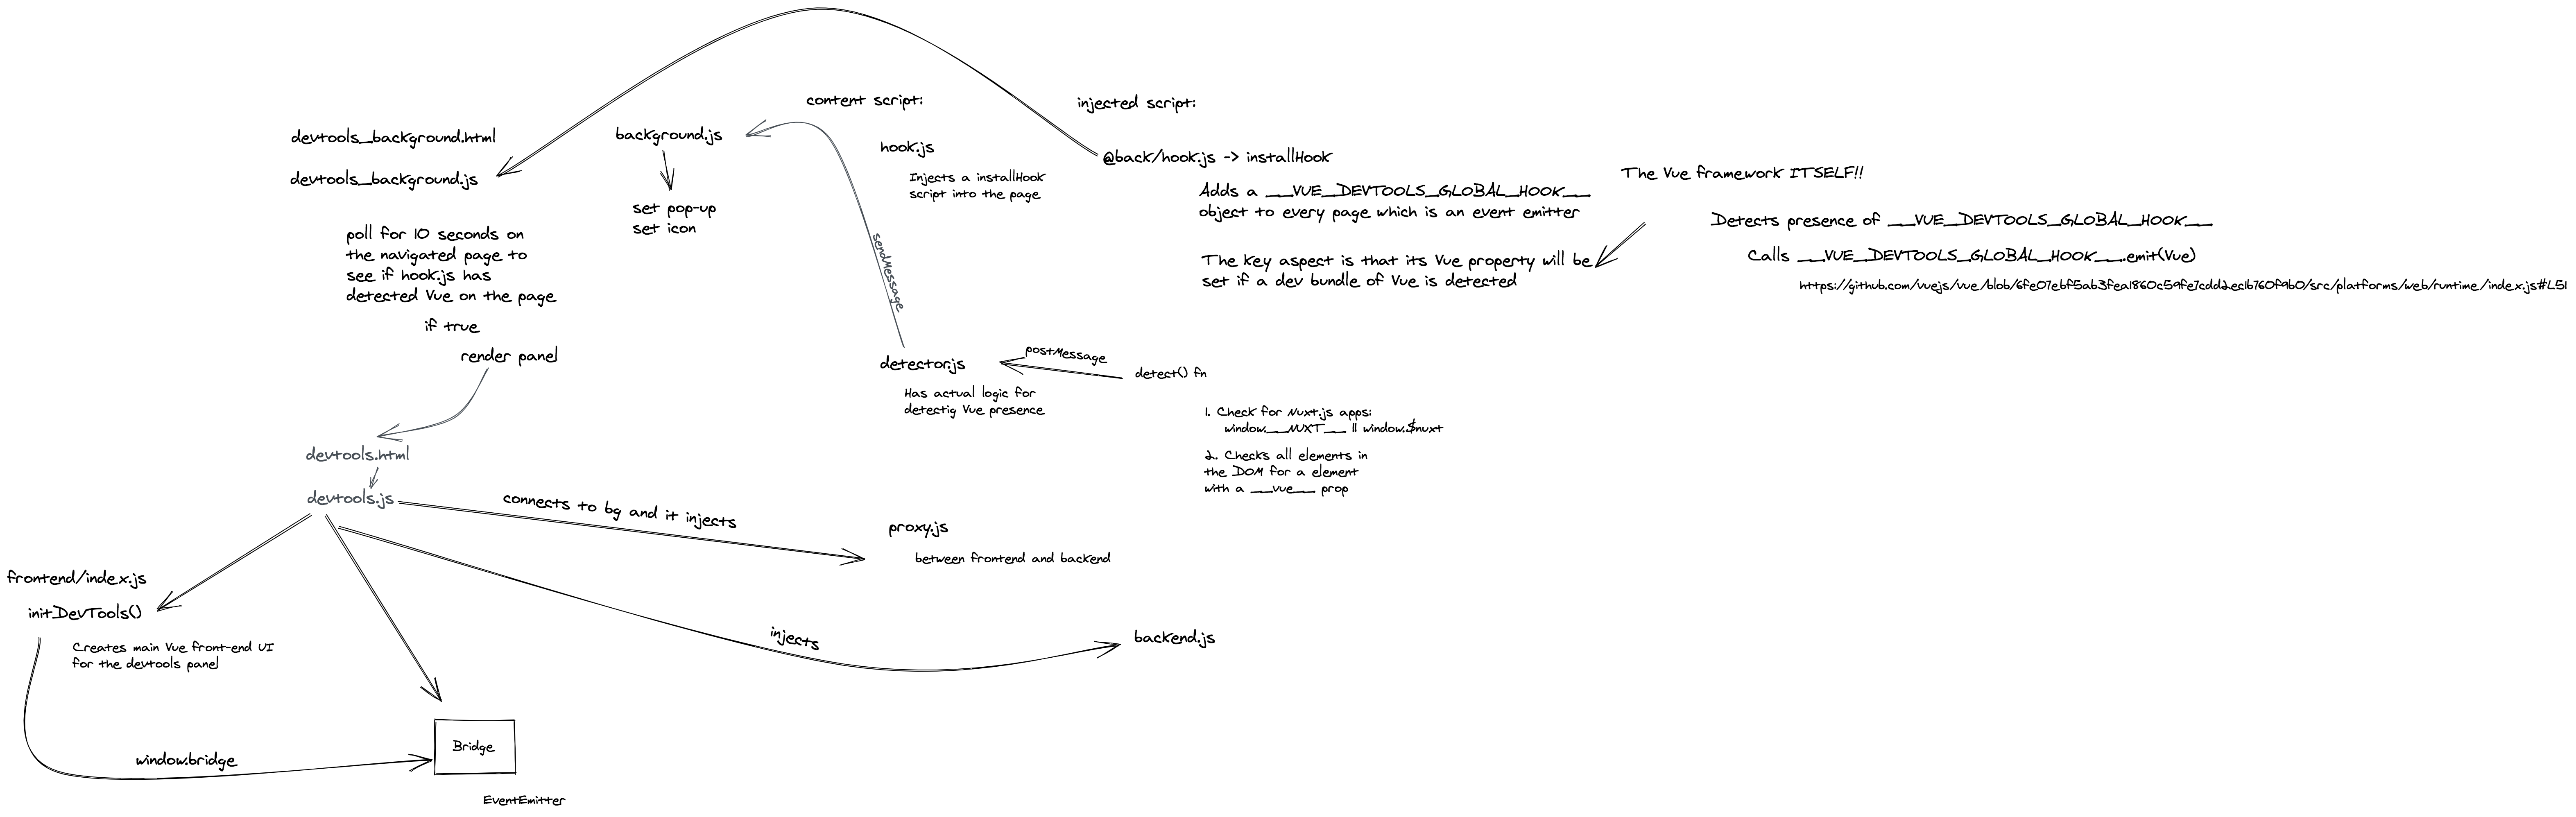
The main code of the detector content script, however, is contained on the detect function (see the source code here). It polls the document for 10 seconds and checks for one of these possibilities:
window.__NUXT__orwindow.$nuxtare detected.- There's an element inside the DOM tree that contains a
__vue__property.
In either case, the Vue constructor is extracted and postMessage is used to send a message to the window (i.e. from the injected script to the content script).
detector.js attaches an onMessage event listener to handle messages received from the injected scripts:
// shell-chrome/src/detector.js

window.addEventListener("message", (e) => {
  if (e.source === window && e.data.vueDetected) {
    chrome.runtime.sendMessage(e.data);
  }
});
You might be wondering what's that chrome global object, where does it come from? That's the "magic" of a content script. Content scripts have access to the Chrome Extension API. In this case, chrome.runtime.sendMessage is used to send the message received from the injected script to the background script.
Background script
Wait, what's a background script? Well, it's another type of script present in browser extensions.
A background script acts like an event listener which stays dormant until an event fires from either the DevTools page or a content script. It's used as a central message bus that communicates with the different scripts of our extension. They run in the context of the browser.
In the future, service workers are going to be used instead of background scripts as part of Google Chrome extensions. This change is part of a set of changes that are tracked under Manifest version 3 for extensions.
This background script, in particular, has a chrome.runtime.onMessage listener registered that can be used by any process that is part of the extension. Here it's only used by detector.js, so its code is not large:
// shell-chrome/src/backgroound.js

chrome.runtime.onMessage.addListener((req, sender) => {
  if (sender.tab && req.vueDetected) {
    const suffix = req.nuxtDetected ? ".nuxt" : "";

    chrome.browserAction.setIcon({
      tabId: sender.tab.id,
      path: {
        16: `icons/16${suffix}.png`,
        48: `icons/48${suffix}.png`,
        128: `icons/128${suffix}.png`,
      },
    });
    chrome.browserAction.setPopup({
      tabId: sender.tab.id,
      popup: req.devtoolsEnabled
        ? `popups/enabled${suffix}.html`
        : `popups/disabled${suffix}.html`,
    });
  }
});
That's the logic that makes the Vue DevTools extension icon colorful when Vue is detected on the current page, and as you can see, even the HTML file for the corresponding popup is referenced.
That's enough background script for now 😅. Later on, we are going to explore the rest of it.
Hook
Like detector.js, there was another content script declared on the manifest file. Remember, these are our entry points). This is hook.js.
// shell-chrome/src/hook.js

import { installHook } from "@back/hook";
This is the only line of specific code. The rest of the logic that you can check if you inspect its source code, is just the very same logic to inject a script that is used on detector.js.
I suspect that the installScript definition that we studied earlier could be extracted to a common module and imported from both content scripts. Might be something nice to try and perhaps send a PR for 👀.
@back on the @back/hook module path is an alias that is defined using Webpack. They are defined here. @back points to app-backend/src, so to learn more about installHook we need to open the hook.js module.
As the comments on top of that file explain, this is mainly an event emitter implementation that is exposed under the __VUE_DEVTOOLS_GLOBAL_HOOK__ global variable:
// app-backend/src/hook.js

Object.defineProperty(target, "__VUE_DEVTOOLS_GLOBAL_HOOK__", {
  get() {
    return hook;
  },
});
After defining the event emitter, a listener for the init event is added:
// app-backend/src/hook.js

hook.once("init", (Vue) => {
  hook.Vue = Vue;

  Vue.prototype.$inspect = function () {
    const fn = target.__VUE_DEVTOOLS_INSPECT__;
    fn && fn(this);
  };
});
A Vue property is set on hook. It's a very important property since it's the main reference to the Vue instance of the currently inspected page.
I was confused for some time at this point. We already had detector.js that knows when there's a Vue instance, but it never invokes __VUE_DEVTOOLS_GLOBAL_HOOK__ in any way. What's going on here? When is this "init" event emitted? After a lot of debugging around the vue-devtools repository, I wasn't able to find it, it was surely not related to detector.js in any way, but where was the call to emit this event?
After A LOT of debugging, I found out that I wasn't looking at the correct place at all. Turns out it's done by the Vue runtime itself!!!
Here's the code under the core Vue repo:
import { devtools, inBrowser } from "core/util/index";

/// ...

if (config.devtools) {
  if (devtools) {
    devtools.emit("init", Vue);
  } else if (
    process.env.NODE_ENV !== "production" &&
    process.env.NODE_ENV !== "test"
  ) {
    console[console.info ? "info" : "log"](
      "Download the Vue Devtools extension for a better development experience:\n" +
        "https://github.com/vuejs/vue-devtools"
    );
  }
}
Aha! devtools.emit('init', Vue) is the call that starts the magic. But what exactly is this config.devtools object?
If we follow the codebase we can check that the devtools object is defined to something familiar to us:
// detect devtools
export const devtools = inBrowser && window.__VUE_DEVTOOLS_GLOBAL_HOOK__;
It's the exact window.__VUE_DEVTOOLS_GLOBAL_HOOK__ reference injected by the hook.js file that we saw earlier. Now we're closing the loop!
And that's it for the initial content scripts that unconditionally run for every web page we visit while the Vue DevTools extension is active. We also got to know our background script.
DevTools page
This journey continues by looking at the devtools_page property defined in the manifest file. It specifies a page that will be used when the user opens the DevTools panel of the browser (e.g. using the Ctrl/⌘ + J keys combination). Usually, that page only inserts a <script> tag that will handle all the actual logic that we want to run in the DevTools window context. In our case, this is the devtools_background.js file. That file is what is known as a devtools script:
// shell-chrome/src/devtools-background.js

// This is the devtools script, which is called when the user opens the
// Chrome devtool on a page. We check to see if we global hook has detected
// Vue presence on the page. If yes, create the Vue panel; otherwise poll
// for 10 seconds.
Those are the top comments of the file. Pretty self-explanatory! The "global hook" refers to window.__VUE_DEVTOOLS_GLOBAL_HOOK__.Vue, that as we just saw, will be defined if the Vue runtime emits the "init" event.
You can check the createPanelIfHasVue function to learn more about their polling mechanism (Recursive calls to setTimeout with 1000 ms of delay until a counter increments up to 10, effectively trying for 10 seconds).
Here's what then happens when Vue is detected:
chrome.devtools.panels.create(
  "Vue",
  "icons/128.png",
  "devtools.html",
  (panel) => {
    // panel loaded
    panel.onShown.addListener(onPanelShown);
    panel.onHidden.addListener(onPanelHidden);
  }
);
That's all the code that is required to add a new panel to the Chrome DevTools window! We define the title of the tab, its icon, the page to render and a callback to be invoked after creation.
Backend and Frontend
The actual DevTools panel is unsurprisingly, a regular Vue.js SPA. The HTML on devtools.html is mainly a placeholder to be filled once Vue takes over:
<body>
  <div id="container">
    <div id="app"></div>
  </div>
  <script src="./build/devtools.js"></script>
</body>
The SPA initialization logic is under the src/devtools.js script:
// shell-chrome/src/devtools.js

import { initDevTools } from '@front'
import Bridge from '@utils/bridge'

initDevTools({
  connect (cb) {
    // 1. inject backend code into page
    injectScript(chrome.runtime.getURL('build/backend.js'), () => {
      // 2. connect to background to setup proxy
      const port = chrome.runtime.connect({
        name: '' + chrome.devtools.inspectedWindow.tabId
      })
      let disconnected = false
      port.onDisconnect.addListener(() => {
        disconnected = true
      })

      const bridge = new Bridge({
        listen (fn) {
          port.onMessage.addListener(fn)
        },
        send (data) {
          if (!disconnected) {
            port.postMessage(data)
          }
        }
      })
      // 3. send a proxy API to the panel
      cb(bridge)
    })
}
After all the initial boilerplate, here is where stuff gets interesting 🎉. This DevTools extension follows a model based on two main actors: backend and frontend.
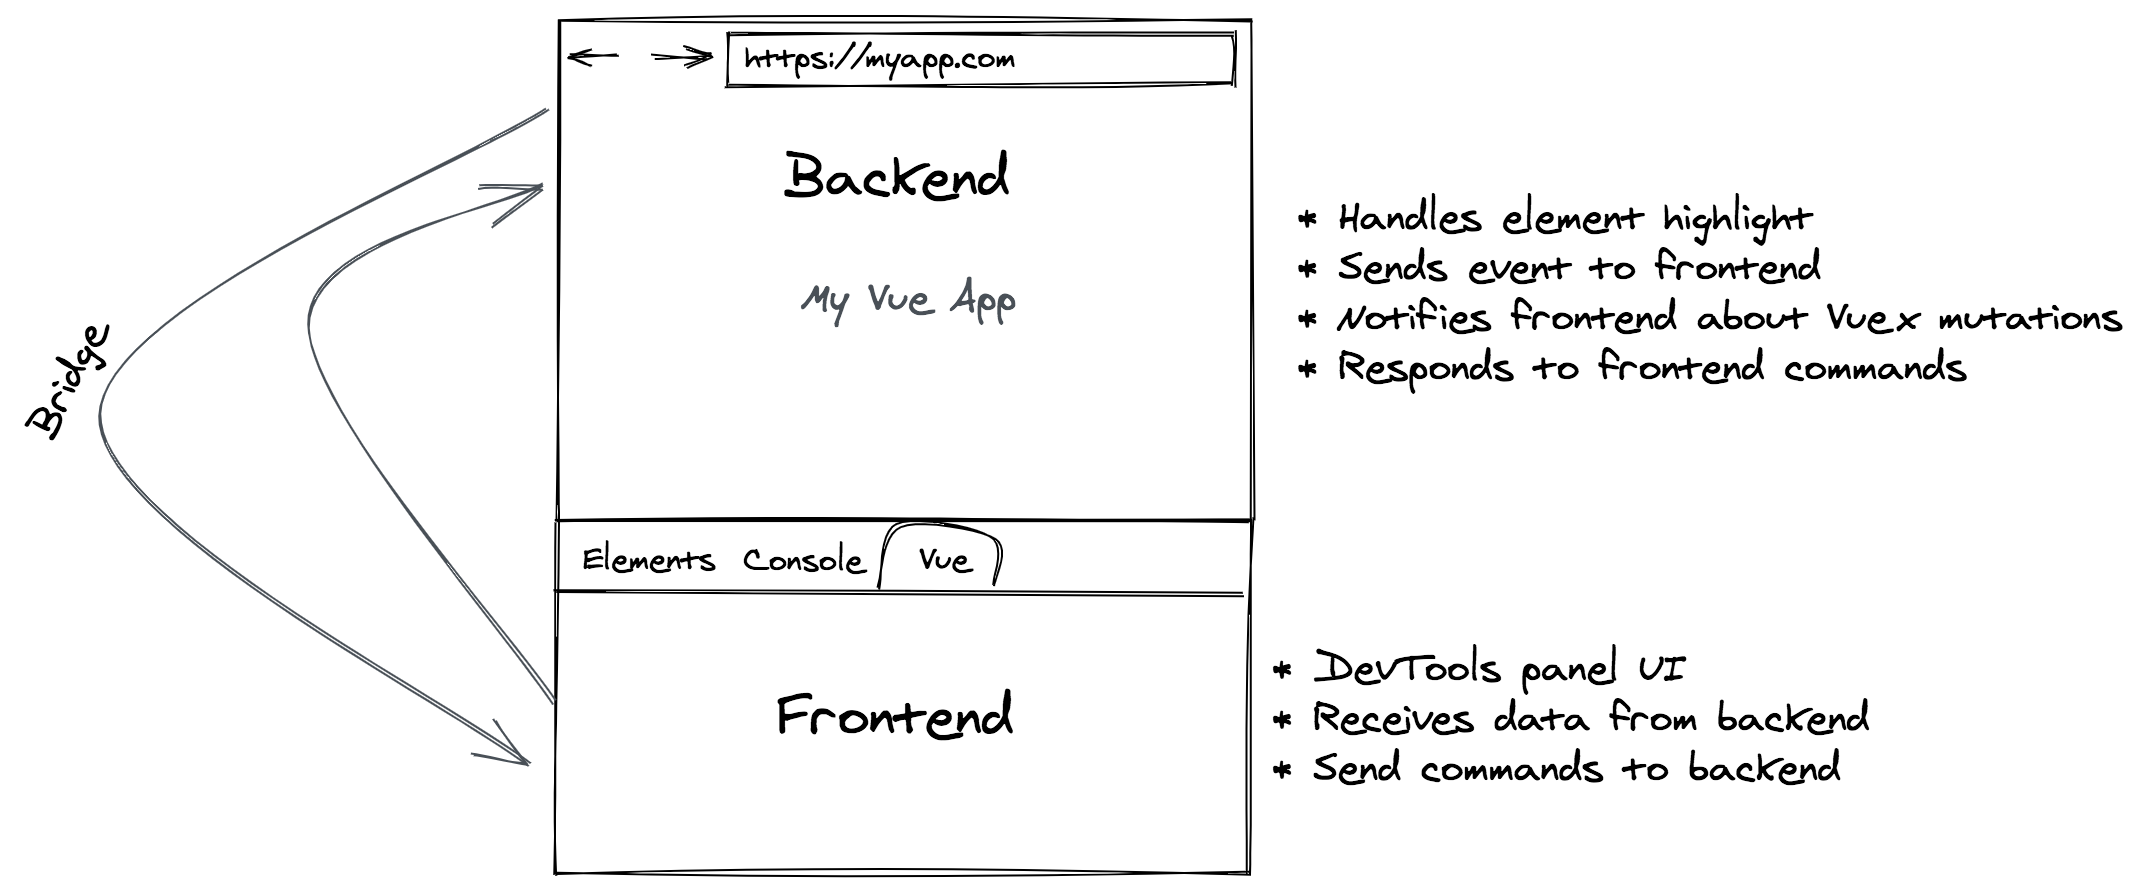
We can think of this like any regular client/server application where these two parts interchange information with each other. In our case, the "frontend" is the Vue DevTools panel itself, and our backend is a pair of content and injected scripts that run in the context of the inspected web page.
devtools.js adds the src/backend.js injected script to the page. Afterward, it establishes a connection to the background script and initializes an instance of a custom Bridge class registering two callbacks on it, listen and send, based on messages received from and sent to the background script respectively.
Before diving further into the frontend, let's take a look at what happens on src/backend.js:
// shell-chrome/src/backend.js

function sendListening() {
  window.postMessage(
    {
      source: "vue-devtools-backend-injection",
      payload: "listening",
    },
    "*"
  );
}
sendListening();
The window (of the inspected page) is used as a communication mechanism. As soon as this script starts, this {source: 'vue-devtools-backend-injection', payload: 'listening'} message is sent.
// shell-chrome/src/backend.js

window.addEventListener("message", handshake);

function handshake(e) {
  if (e.data.source === "vue-devtools-proxy" && e.data.payload === "init") {
    window.removeEventListener("message", handshake);

    let listeners = [];
    const bridge = new Bridge({
      listen(fn) {
        const listener = (evt) => {
          if (evt.data.source === "vue-devtools-proxy" && evt.data.payload) {
            fn(evt.data.payload);
          }
        };
        window.addEventListener("message", listener);
        listeners.push(listener);
      },
      send(data) {
        window.postMessage(
          {
            source: "vue-devtools-backend",
            payload: data,
          },
          "*"
        );
      },
    });

    // ...[some code ignored]

    initBackend(bridge);
  } else {
    sendListening();
  }
}
Just like on the DevTools panel, here a Bridge instance registering a pair of listen/send callbacks is constructed. However, instead of relying on the background script to propagate the messages, the window itself is used to listen to MessageEvents or trigger postMessage accordingly.
Bridge
Here is the Bridge constructor itself that both backend and frontend are using:
// shared-utils/src/bridge.js

import { EventEmitter } from "events";

const BATCH_DURATION = 100;

export default class Bridge extends EventEmitter {
  send(event, payload) {
    // ...
  }

  // Log a message to the devtools background page.
  log(message) {
    this.send("log", message);
  }

  _flush() {
    // ...
  }

  _emit(message) {
    // ...
  }

  _send(messages) {
    // ...
  }

  _nextSend() {
    // ...
  }
}
Bridge is an event emitter! And it's the main communication mechanism between the backend and the frontend.
Remember how as part of the Devtools panel initialization, on src/devtools.js, a background script connection was established?
// shell-chrome/src/devtools.js

// 1. inject backend code into page
injectScript(chrome.runtime.getURL('build/backend.js'), () => {
  // 2. connect to background to setup proxy
  const port = chrome.runtime.connect({
    name: '' + chrome.devtools.inspectedWindow.tabId
  })
Here is how the background script reacts to that:
// shell-chrome/src/background.js

chrome.runtime.onConnect.addListener((port) => {
  let tab;
  let name;
  if (isNumeric(port.name)) {
    tab = port.name;
    name = "devtools";
    installProxy(+port.name);
  } else {
    tab = port.sender.tab.id;
    name = "backend";
  }

  if (!ports[tab]) {
    ports[tab] = {
      devtools: null,
      backend: null,
    };
  }
  ports[tab][name] = port;

  if (ports[tab].devtools && ports[tab].backend) {
    doublePipe(tab, ports[tab].devtools, ports[tab].backend);
  }
});
If port.name from the incoming connection to the background script is numeric, then it's assumed to be the Devtools panel and thus, installProxy is invoked (the + prefixed to port.name is used to coerce the string value to a number).
// shell-chrome/src/background.js

function installProxy(tabId) {
  chrome.tabs.executeScript(
    tabId,
    {
      file: "/build/proxy.js",
    },
    function (res) {
      if (!res) {
        ports[tabId].devtools.postMessage("proxy-fail");
      } else {
        console.log("injected proxy to tab " + tabId);
      }
    }
  );
}
Proxy
installProxy adds a new content script: src/proxy.js. Unlike the two initial content scripts that are declared on the manifest.json file and are executed on every page load, this one is dynamically added using the chrome.tabs.executeScript API under the condition we saw earlier. Let's analyze what's this proxy.js content script is about:
// shell-chrome/src/proxy.js

const port = chrome.runtime.connect({
  name: "content-script",
});

port.onMessage.addListener(sendMessageToBackend);
window.addEventListener("message", sendMessageToDevtools);
port.onDisconnect.addListener(handleDisconnect);
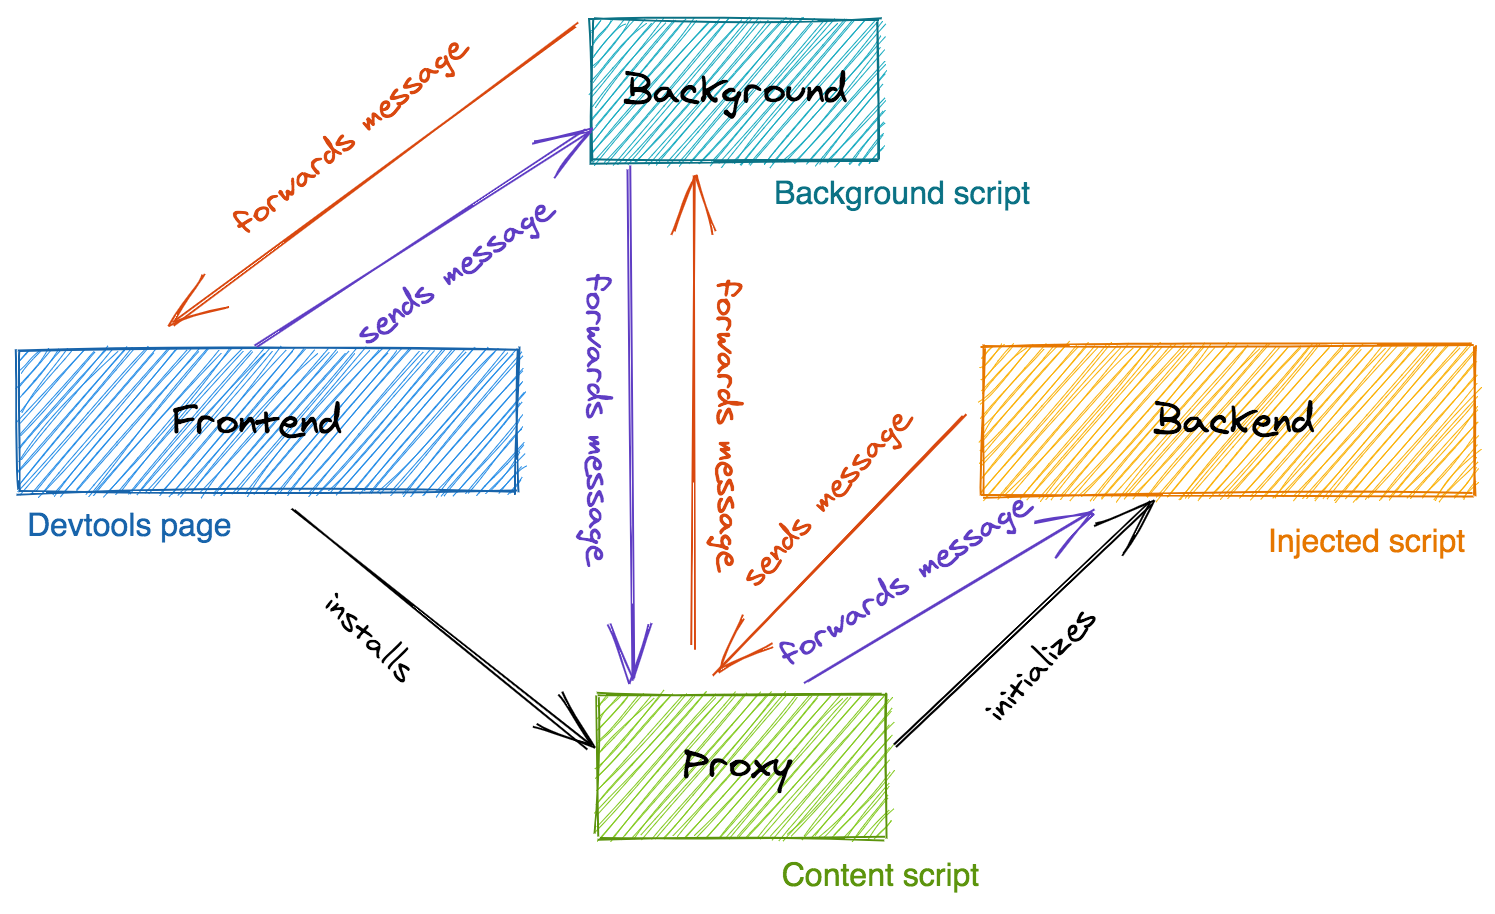
In the first place, proxy.js also connects to the background script and then sets up a listener for messages that the background script sends, in which case it forwards the message to the backend. Also, a listener for messages received from the inspected web page is set, in which case it forwards the message to the frontend - a.k.a. the Devtools panel.
// shell-chrome/src/proxy.js

sendMessageToBackend("init");

function sendMessageToBackend(payload) {
  window.postMessage(
    {
      source: "vue-devtools-proxy",
      payload: payload,
    },
    "*"
  );
}
This might result familiar: An init message is sent to the backend, which is, as we saw earlier, what src/backend.js was waiting for on its handshake function to continue its initialization.
// shell-chrome/src/proxy.js

function sendMessageToDevtools(e) {
  if (e.data && e.data.source === "vue-devtools-backend") {
    port.postMessage(e.data.payload);
  } else if (e.data && e.data.source === "vue-devtools-backend-injection") {
    if (e.data.payload === "listening") {
      sendMessageToBackend("init");
    }
  }
}
For propagating messages back to the frontend, it uses the connection to the background script. Despite its name, there's one case it sends an 'init' message to the backend instead. If the message received from the window is a 'listening' one. This is a special message that is sent by the backend itself to signal it's waiting for initialization.
Even though the Bridge instances are constructed on src/devtools.js and src/backend.js, they both send those instances to the respective frontend and backend packages of the extension through callbacks.
In the case of src/devtools.js:
// shell-chrome/src/devtools.js

import { initDevTools } from '@front'

initDevTools({
  connect (cb) {
    injectScript(chrome.runtime.getURL('build/backend.js'), () => {
      // ...
      const bridge = new Bridge({
        // ...
      })
      cb(bridge)
    })
  }
In the case of src/backend.js:
// shell-chrome/src/backend.js

import { initBackend } from '@back'

function handshake (e) {
  if (e.data.source === 'vue-devtools-proxy' && e.data.payload === 'init') {
    // ...
    const bridge = new Bridge({
      // ...
    })

    // ...
    initBackend(bridge)
  }
}
So now that both the frontend and backend implementations hold instances to their respective communication bridge, we can take a look at how they use it.
Frontend
Let's take a look at the initDevTools function of app-frontend/src/index.js:
// app-frontend/src/index.js

export function initDevTools(shell) {
  initStorage().then(() => {
    initApp(shell);
    shell.onReload(() => {
      if (app) {
        app.$el.classList.add("disconnected");
        app.$destroy();
      }
      window.bridge.removeAllListeners();
      initApp(shell);
    });
  });
}
shell is the object literal constructed on shell-chrome/src/devtools.js that contains some methods that are invoked here.
initStorage uses the chrome.storage API as a storage mechanism.
initApp is where the UI magic happens:
// app-frontend/src/index.js

function initApp (shell) {
  shell.connect(bridge => {
    window.bridge = bridge
  // ...
The assignment where the fundamental communication link is established here, window.bridge = bridge. Now it's available on the global context of the Devtools panel.
// app-frontend/src/index.js

    initSharedData({
      bridge,
      Vue,
      persist: true
    }).then(() => {
      if (SharedData.logDetected) {
        bridge.send('log-detected-vue')
      }

      const store = createStore()

      bridge.once('ready', version => {
        store.commit(
          'SHOW_MESSAGE',
          'Ready. Detected Vue ' + version + '.'
        )
        bridge.send('events:toggle-recording', store.state.events.enabled)

        if (isChrome) {
          chrome.runtime.sendMessage('vue-panel-load')
        }
      })
    // ...
A set of shared data between the frontend and the backend is initialized. Once it's done, a Vuex store is created (after all, the devtools panel is a regular Vue.js app!) and a listener for the ready event is added.
You can explore what's this "shared data" consists of by going to shared-utils/src/shared-data.js. As part of the shared data initialization, more messages are transmitted using the bridge:
// shared-utils/src/shared-data.js

bridge.on("shared-data:load", () => {
  // Send all fields
  Object.keys(internalSharedData).forEach((key) => {
    sendValue(key, internalSharedData[key]);
  });
  bridge.send("shared-data:load-complete");
});

bridge.on("shared-data:init-complete", () => {
  clearInterval(initRetryInterval);
  resolve();
});

bridge.send("shared-data:master-init-waiting");

// In case backend init is executed after frontend
bridge.on("shared-data:slave-init-waiting", () => {
  bridge.send("shared-data:master-init-waiting");
});
Going back to the frontend, here are some additional listeners that are set up:
// app-frontend/src/index.js

// ...
bridge.on("instance-details", (details) => {
  store.commit("components/RECEIVE_INSTANCE_DETAILS", parse(details));
});

bridge.on("toggle-instance", (payload) => {
  store.commit("components/TOGGLE_INSTANCE", parse(payload));
});

bridge.on("vuex:init", () => {
  store.commit("vuex/INIT");
});

bridge.on("vuex:mutation", (payload) => {
  store.dispatch("vuex/receiveMutation", payload);
});

bridge.on("router:changed", (payload) => {
  store.commit("router/CHANGED", parse(payload));
});

bridge.on("routes:init", (payload) => {
  store.commit("routes/INIT", parse(payload));
});

bridge.on("routes:changed", (payload) => {
  store.commit("routes/CHANGED", parse(payload));
});

// ...
Those are just some examples of some hooks that are added so that the backend can instruct devtools about state mutations and router changes.
After all of this, the Vue app is mounted into the div element with id app defined on devtools.html, and that's it! You can keep exploring the different Vue components, Vuex mutations, bridge events and messages sent, etc.
Backend
Now it's the turn of the backend, what's happens on app-backend/src/index.js?
// app-backend/src/index.js

const hook = target.__VUE_DEVTOOLS_GLOBAL_HOOK__;

export function initBackend(_bridge) {
  bridge = _bridge;

  if (hook.Vue) {
    isLegacy = hook.Vue.version && hook.Vue.version.split(".")[0] === "1";
    connect(hook.Vue);
  } else {
    hook.once("init", connect);
  }

  initRightClick();
}
Great, a reference to the bridge is also stored and a check exists to know if the Vue instance was already detected. In case it hasn't, we wait for it. Otherwise, we proceed to connect to it.
// app-backend/src/index.js

function connect (Vue) {
  initSharedData({
    bridge,
    Vue
  }).then(() => {
    // ...
Here the same shared data is also initialized, like what we saw for the frontend (hence, why it's been given that name). Then:
// app-backend/src/index.js

hook.currentTab = "components";
bridge.on("switch-tab", (tab) => {
  hook.currentTab = tab;
  if (tab === "components") {
    flush();
  }
});

// the backend may get injected to the same page multiple times
// if the user closes and reopens the devtools.
// make sure there's only one flush listener.
hook.off("flush");
hook.on("flush", () => {
  if (hook.currentTab === "components") {
    flush();
  }
});
Some listeners are set up using the bridge and setting the currentTab property of the hook (window.__VUE_DEVTOOLS_GLOBAL_HOOK__) to know when to perform a 'flush' (which is a Vue instance status sync cycle where the component tree structure is sent over to the devtools, to avoid dealing with stale data).
// app-backend/src/index.js

bridge.on("select-instance", (id) => {
  currentInspectedId = id;
  const instance = findInstanceOrVnode(id);
  if (!instance) return;
  if (!/:functional:/.test(id)) bindToConsole(instance);
  flush();
  bridge.send("instance-selected");
});

bridge.on("scroll-to-instance", (id) => {
  const instance = findInstanceOrVnode(id);
  if (instance) {
    scrollIntoView(instance);
    highlight(instance);
  }
});

bridge.on("filter-instances", (_filter) => {
  filter = _filter.toLowerCase();
  flush();
});

bridge.on("refresh", scan);
Additional listeners are added, that allows the inspected page to respond to DOM instructions sent from the devtools panel. Such as scrolling to a component, scan the page for root Vue instances, or select a component instance.
After the backend initialization ends, a ready event is sent through the bridge:
// app-backend/src/index.js

bridge.send("ready", Vue.version);
That, if you remember from earlier, is picked up on the frontend.
That's it for our backend initialization walkthrough! I'd highly recommend you to keep exploring the multiple aspects of the extension, such as the Vuex initialization and routing initialization logic, and study the different interactions between the frontend and the backend.
Conclusion
And here is where this journey ends!
When I started studying how a production-level developer tools extension was made, I never imagined it would have this level of complexity and moving parts.
I hope that this write-up can be helpful if you're thinking about making the Vue Devtools even better, or if you need to build an awesome new Devtools extension for your use case
I realized that there aren't that many resources available explaining the different aspects of one so perhaps this can help a bit :)
Thank you for reading and have a nice day!